


")
Today I will be sharing with you one of the hottest and most popular nail design technique called as ombre/gradient.This is a special kind of nail art technique in which the color is graduated from light shade to dark shade and vice versa.To achieve this ombre nail look you don’t have to follow the exact technique.You can add your own creativity and instead of using monochromatic shades of a single color you can use contrasting colors to get the desired ombre nail effect.
Here are the 5 fantastic ombre nail design with detailed steps and pictures.
1.Polychromatic Ombre Diagonal Nail Design
Add colors to your summer.Get this colourful and funky ombre design on your nails.This is one of the hottest summer’s nail design and compliments multicolored and bright-colored outfit.

Things that you need – 4 bright color nail polish, black nail color to create the diagonal, clear transparent polish for top coat, sellotape and cotton swab.
Steps
1.Cut a piece of sellotape and place it diagonally on the nail.
2.Wet a cotton swab by dipping in water.Pour few drops of any nail color on a plastic plate.Dip the wet cotton swab onto the colors and dab onto the base area of your nail.
3.Similarly repeat using 2 different nail colors.

4.Once it has dried, gently remove the sellotape.
5.To color the other diagonal use contrasting colors.
6.Separate the two diagonal by drawing a solid black color line with the help of a nail brush.
2.Ombre Bridal Design Nail
One of the gorgeous ombre nail design to complement red bridal sarees or lehengas with golden and silver embellishments.This nail design can be achieved by simply creating ombre nails using dark bridal nail colors and then decorating with gold and silver colored dots.

Things that you need – Black, maroon and red nail colors for creating ombre nails, clear transparent polish for top coat, gold and silver nail colors for creating dots, cotton swab, toothpick and safety-pin.
Steps
1.Wet a cotton swab by dipping in water.Pour few drops of black color on a plastic plate.Dip the wet cotton swab onto the colors and dab onto the base area of your nail.
2.Similarly repeat for maroon and red nail colors.Go from dark to light shade.
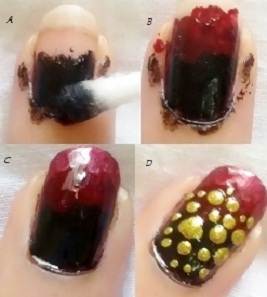
3.Once the color has dried, apply a layer of clear transparent polish.
4.Using a toothpick and safety-pin create big and small sized golden or silver dots.
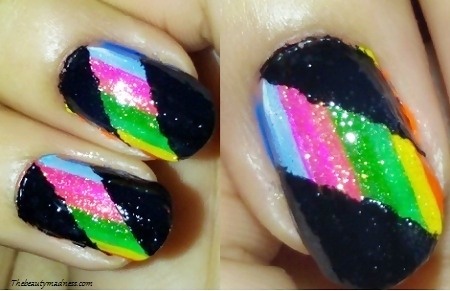
3.Rainbow Diagonal Ombre Stripe Nail Design
Get this bright, eye-catchy and fabulous ombre effect on your nails.This ombre nail art can be achieved by drawing vertical rainbow stripes and then painting the uncovered part with black nail color.
Things that you need – 5 dark and light shades of nail colors, nail striper, clear glitter nail polish, clear and black color nail polish and sellotape.
Steps
1.Draw vertical lines across the nails using one light shade and dark shade of same color.Use nail striper to draw the lines.
2.Repeat similarly for 3 different nail colors of light and dark shades.
3.Once it has dried completely, apply a layer of clear glitter nail polish.
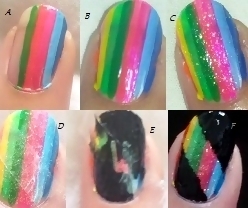
4.Take a sellotape and cut a thin piece of it.Stick the piece of sellotape diagonally on your nails.
5.Paint your nails with black color nail polish.
6.Once the color has dried, gently remove the tape and apply a clear top coat.
4.Pink Ombre Golden Ring Design
This nail designs gives you a classy and elegant look.You can pair up with pink or black evening dress, party dress or cocktail dress.
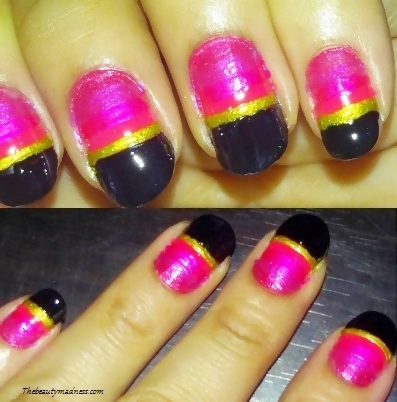
Things that you need – 4 different shades of pink color nail polish for creating ombre nails, golden and black color nail colors for decorating, clear transparent polish for top coat and nail striper.
Steps
1.Draw straight lines across the nails using 4 different shades of pink nail colors.Start with the darkest shade color to lighter shade.The colors should cover a bit more than half of your nail.
2.Now draw an intense bold line using a golden nail color.
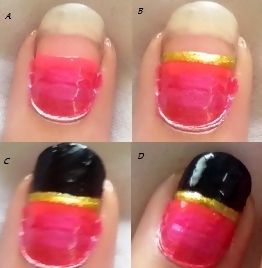
3.Color the rest part of your nail with black color polish.
4.Once the color dries completely, apply clear top coat only to the part that is painted black.
5.Ombre Animal Print Nail Design
This colourful nail design can be achieved by creating ombre nails using contrasting colors and then overlaying with animal print.
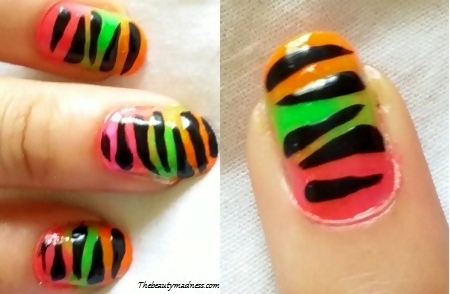
Things that you need – Pink, green and orange nail colors for creating ombre nails, clear transparent polish for top coat, white color polish for base coat, black nail color for creating animal print and cotton or sponge.
Steps
1.Apply 2 layers of white color base coat and allow it to dry completely.
2.Wet a cotton ball by dipping it in water.Now using green, orange and pink nail colors draw line on the wet cotton or in a makeup sponge and dab it on your nails.
3.Repeat the process 3 times to get intense color coat.
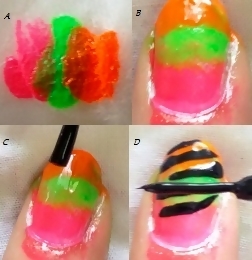
4.Once the color has dried, apply a layer of clear transparent polish.
5.Use the tip of your nail brush to create the animal print.Start from the side of your nail, create horizontal lines from alternate side.


