


Nail art designs has become the biggest beauty trend in the fashion world over the past few years.It has become the greatest fashion accessory among women of all ages.Now days every woman wants to decorate their nails in a creative way.Like others, you can also make your nails look gorgeous and stunning with these simple and cute 1 minute nail art designs.These nails designs suits short as well as long nails and can be worn with any outfit.You can achieve these nail art look without using any professional nail art brushes or tools.
Here are the nail designs with detailed picture and steps.
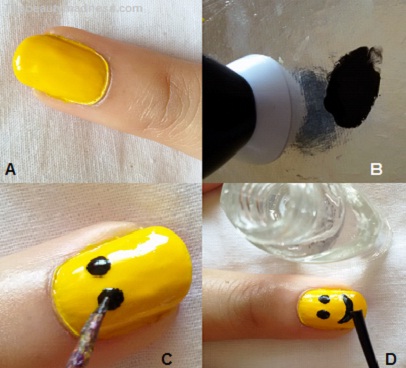
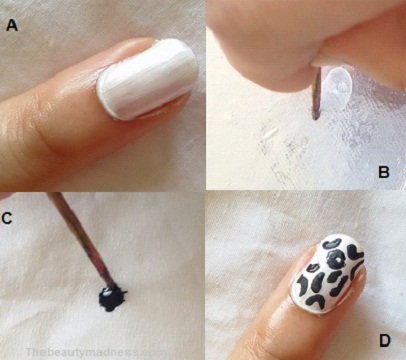
1.Smiley Nail Art
Feeling happy, sad or angry at someone, then express it through nails with this wide range of emoticons and smileys that are designed to express your emotions.

How to do
Things that you need – Yellow nail polish, black nail polish, clear nail polish (top coat), toothpick and plastic plate.
Steps
A.Apply 2 thin layer of yellow nail polish and allow it to dry completely.
B.Pour few drops of black nail polish on the plate.
C.Dip the tip of your toothpick into the color and create your desired emoticon.
D.Apply a topcoat to prevent chipping and to make nail polish last longer.
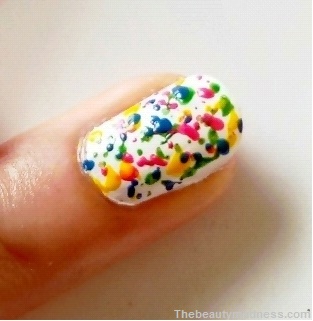
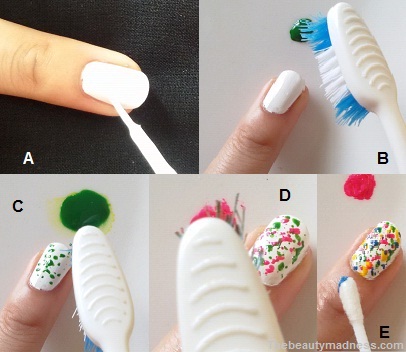
2.Color Splash Nail Art Design
It’s the quick and fun way to color your nails.It’s all about creating uneven dotted color splash on a white background.
How to do
Things that you need – Toothbrush, white nail polish, clear nail polish (top coat), 4 bright nail polish colors of your choice, plastic plate, cotton bud and nail polish remover.
Steps
A.Apply 2 coats of white nail color and allow it to dry completely.
B.Pour few drops of colored nail polish on the plate.
C.Dip your brush into the desired color and gently dab it on your fingers.
D.Repeat the procedure for each color.
E.Clean off the excess using a cotton bud dipped in nail remover.
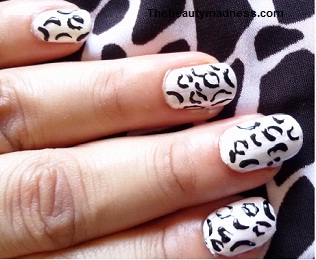
3.Leopard Print Nail Art
Animal prints have always been a popular style element in the fashion industry, especially leopard print that never go out of style.Make a bold fashion statement with this wild and funky leopard nail prints.
Things that you need – white nail polish, clear polish as top coat, black nail polish, toothpick and paper.
Steps
A.Apply 2 layer of white polish and allow the color to dry completely.
B.Make the pointed part of the toothpick blunt by pushing against a hard surface.
C.Pour few drops of black nail polish on the paper.
D.Dip the tip of your toothpick into the color and create irregular and broken circles and semicircles.
C.Apply a topcoat for a glossy shine.
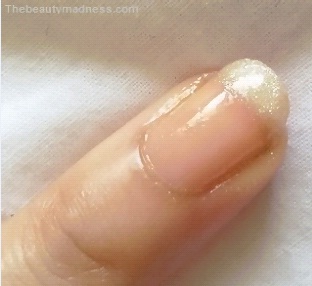
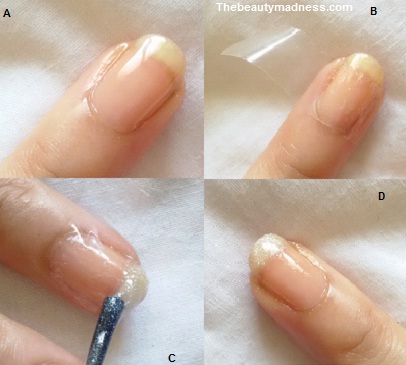
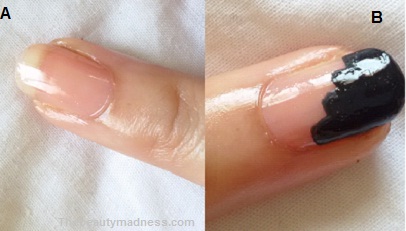
4.Sparkling French Tip Nail Design
This nail style is inspired by the classic french manicure design where the nails are kept natural and the tips of the nails are painted with a sparkling white nail polish.
How to do
Things that you need – clear nail polish for base coat, white or silver shine nail polish and cello tape.
Steps
A.Apply a thin layer of clear nail polish as base coat.Allow the base coat to dry completely.
B.Cover your nail with a cello tape leaving the tip of your nail.
C.Now paint the tip of your nail with sparkling white nail paint and allow it to dry.
D. Remove the cello tape and you are ready with your classy french manicure design.
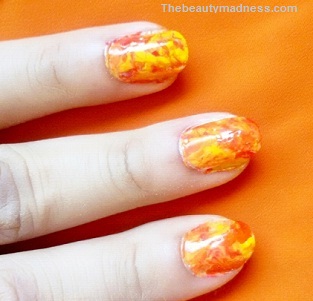
5.Color Blend Nail Design
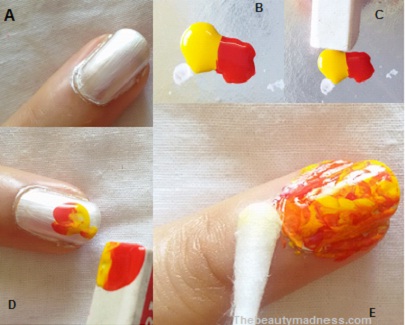
This amazing nail art is created by combining two primary colors to form a secondary color.Like yellow and red combination would give me orange, similarly you can choose any two colors from red, green, blue and yellow that are the primary colors.
How to do
Things that you need – Red and yellow nail polish, white nail polish for base coat, eraser, plastic plate, cotton bud, nail polish remover and clear nail polish for top coat.
Steps
A.Apply a thin layer of white nail polish as base coat and allow it to dry.
B.Pour two drops of red and yellow nail polish on the plate.Try to keep the colors side by side, do not mix together.
C.Now take an eraser and dip it into the nail polish and gently dab it onto your nails.
D.Repeat the procedure until the entire nail is covered.
E.Once the nail polish dries completely, apply a topcoat for better shine.
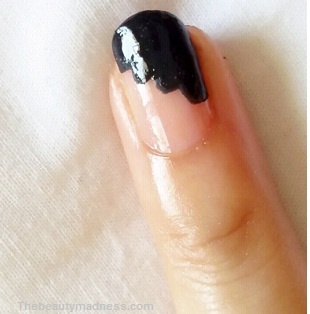
6.Staircase Style Nail Art
Get this trendy and stunning nail art look of a staircase in just 1 minute.
How to do
Things that you need : black and clear colored nail polish.
Steps
A.Apply one layer of clear colour nail polish as base coat.Allow the base coat to dry completely.
B.Now draw four vertical lines using your nail brush.
C.Each line must be shorter than the preceding one and should be in a continuous form with no gaps in between.
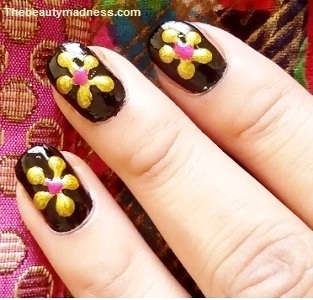
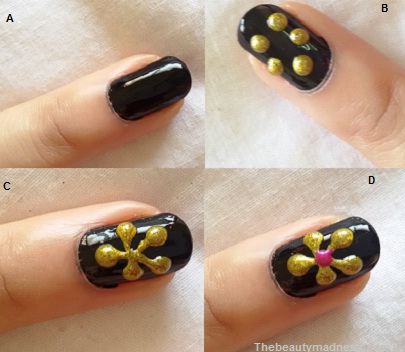
7.Flower Style Nail Art Design
This nail art is created by dragging dots to the center of the circle to form a beautiful flower shape.
How to do
Things that you need – Black, golden and pink nail colors and toothpick.
Steps
A.Apply a layer of black nail polish and allow it to dry completely.
B.To make a flower create 5 golden dots in a circle using nail brush.
C.Now using the tip of the toothpick drag each dot to the center of the circle.
D.Dot the center of each flower with a pink nail color and you are ready with your stunning flower nails.
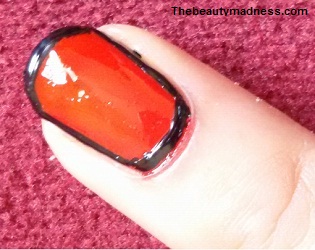
8.Border Nail Art Design
Border nail art is the most easiest way to design your nails.These nail art is created by outlining the edge of your nails with a dark nail color while keeping the base coat light or medium shade.
How to do
Things that you need – Red color nail polish, black color nail polish to border nails, clear nail polish as topcoat and toothpick.

Steps
A.Apply a thin layer of red color nail polish and allow it to dry completely.
B.Dip your toothpick in black nail polish and draw small dots around the border of your nails.
C.Now join the dots to form clean lines.
D.Fill the border with this color and apply a clear nail polish as top coat for a high shine.
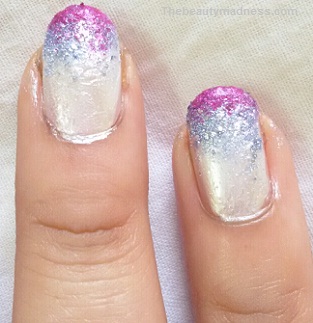
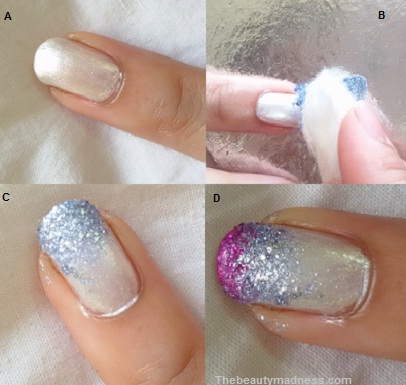
9.Gradient Nail Design
This is an absolutely gorgeous nail art technique that is created by stamping two or more nail polish colors with the help of a cotton ball or a sponge.
How to do
Things that you need – Silver base coat, 2 nail polish colors pink and metallic blue, clear top coat, plastic plate, sponge, cotton swab and nail polish remover.
Steps
A.Paint your nails using the silver color and wait till it dries completely.
B.Drop a generous amount of metallic blue color on the plastic plate.
C.Take a cotton ball, dip it into the color and lightly dab it on the upper half of your nail.Repeat the steps until you have achieved the desired effect.
D.Now again pour 2 to 3 drops of pink nail color and using the cotton ball gently dab it on the tip of your nail.
E.Clean up all the excess using a cotton swab dipped in acetone.
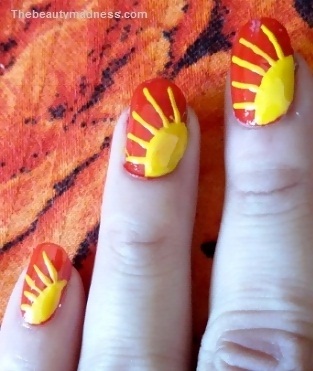
10.Sun Rays Nail Art
As the name suggest this nail art resembles to the rays of the sun.A very unique nail design that looks absolutely perfect to wear in summer.
How to do
Things that you need – Red and yellow color nail polish and clear nail polish for a top coat.
Steps
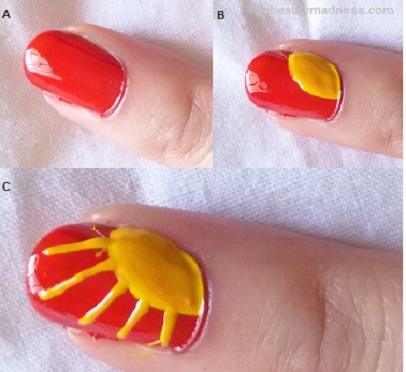
A.Apply two coat of red nail polish and allow it to dry.
B.Using the yellow nail color draw a quarter-circle at the bottom right corner of your nail.
C.Now draw five straight lines extending outward from the quarter-circle like the rays of the sun.You can use the tip of your nail brush or a toothpick to draw the lines.
D.Apply clear nail polish for a gorgeous finish.


All of the nail art designs are really cute. I love the Gradient Nail Design most, it’s so simple, my students will not recognize it if I will do this on my nails. I adore you for being so creative and patient doing all the designs.
“http://www.nails-designs.com/”
thnks 🙂
I have been looking for arts for too long and i was not landing exact on the fabulous page as you have. Bookmarking your page for feature and i hope that this will help me lot to find e favorite nail arts liike this i have seen today.